Create a Retail Store
In order to start selling via the Retail Channels, we need to create a Store to sell through. The Store will be associated with warehoused for stocking, customer address books for sales, and also employee groups to manage who can work at the store and their permissions. Also, later on we will be able to attach POS Registers to the stores so that we can access all of the store information and transactions through a disconnected session, and synchronize with the store later on.
NOTE: This is part of the Setting Up A Retail Store With POS blueprint series where we show how to configure the retail module within Dynamics AX, and then deploy out the Point Of Sale registers for capturing sales. If you want to see all of the other posts in this series, click here.
How to do it…
To create a retail store, follow these steps:
- To access the Store details, open up the Retail stores menu item from the Retail channels folder of the Common group on the Retail Area page.
- To create a new Store click on the Retail Store button in the New group of the Store ribbon bar.
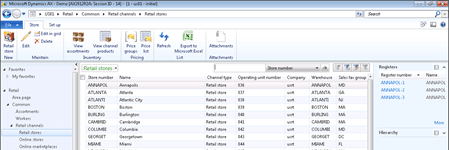
- This will create a new blank Store record for you. If you are not already in edit mode, click on the Edit button in the Maintain group of the Setup ribbon bar group.
- Give your new Store a Name, and Store Number. For our examples, we will continue to use the same naming convention that we used for the Warehouse and use the city name for the store name and code to make it easier to locate. Also, we can link the Store record to the stores Warehouse.

- In the POS register section, pick a default Screen layout ID, Functionality profile, and also Offline profile. Later on we will show how you can create your own screen layouts and profiles, but for now we will use the standard layouts delivered with the system.

- Now we will associate the Store record with a Customer and Employee address book. The Employee address book is the most important of the two, because it will allow you to link the Employees that can use the POS system to the store. Since this is a new Store we will create a new address book for the store. Right click on either of the address book fields, and select the View details option to open up the Address Book maintenance forms.
- To create a new Address Book, click on the New button on the Address book maintenance form.
- Then create a new address book record. Keeping with our naming conventions we’re using, we will give the Address Book record the same name as the Store. After you have done this, close down the form and return to the Store record.

- Now you can associate the Store record with an address book for the customers, and also the employees.

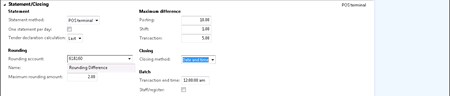
- In the Statement/Closing section of the Store definition, you may want to associate rounding and difference parameters that are allowed by the store.
- In the Miscellaneous section of the store definition, you may also want to turn off the Hide training mode option. This will only show up on the POS register, which we will set up later.

- In the Financial dimensions section we can set the default dimensions for the store.

- The final step in the process is to set up all of the payment methods, shift definitions, cash declarations tec. For the store. Rather than do this by hand, you can save time by clicking on the Copy all menu button from the Copy Group of the Setup ribbon bar.

- This will allow you to select another Store record to copy all of the miscellaneous settings from.

- After you have done that you can click on the Close button to save the Store definition.
