Archive

Dynamics AX

Once the vendor has been approved through the justification approval process, it moves on to the application approval process which allows the purchasing department to add the final details required for the vendor, and when it is approved will also create the new vendor record for you.

NOTE: This is part of the Configuring and Using Vendor Requests blueprint series where we show how to manage the vendor on-boarding process through Dynamics AX and the web portals. If you want to see all of the other posts in this series, click here.

Read More

Before we start the next step in the process we need to create a simple workflow for the approval of the addition of the new vendor through the vendor request.

NOTE: This is part of the Configuring and Using Vendor Requests blueprint series where we show how to manage the vendor on-boarding process through Dynamics AX and the web portals. If you want to see all of the other posts in this series, click here.

Read More

Once the new vendor request has been submitted, the workflow that you configured for the Vendor add justification will start notifying the necessary people that there are requests that need to be approved.

NOTE: This is part of the Configuring and Using Vendor Requests blueprint series where we show how to manage the vendor on-boarding process through Dynamics AX and the web portals. If you want to see all of the other posts in this series, click here.

Read More

Once you have the Vendor add justification workflow defined, users are able to request new vendors through the Employee Self Service Portal and then submit them for approval.

NOTE: This is part of the Configuring and Using Vendor Requests blueprint series where we show how to manage the vendor on-boarding process through Dynamics AX and the web portals. If you want to see all of the other posts in this series, click here.

Read More

Before we start the first step in the process we need to create a simple workflow for the approval of the initial new vendor request. This will allow the purchasing department to quickly weed out the requests that shouldn’t be considered in the first place.

NOTE: This is part of the Configuring and Using Vendor Requests blueprint series where we show how to manage the vendor on-boarding process through Dynamics AX and the web portals. If you want to see all of the other posts in this series, click here.

Read More

Built into Dynamics AX is a feature for managing the setup of new Vendors which allows users to request for new vendors to be added, for the purchasing group approval process by the way of workflows, and finally automatically create new vendor records.  Additionally, if you are using the Vendor Portal, the on-boarding process will allow you to co-ordinate the setup of the vendor users, and if you want to, you van also have the prospective vendors update and approve their information before they are approved to ensure that their details are correct, and that they want to do business with you as well.  This process is a great way to streamline the vendor setup process and is also a time saver because people are involved through the workflow process and all activities are tracked.

In this blueprint we will show how the vendor on-boarding process is handled through the Vendor Requests function within Dynamics AX.

Read More

Now that the workflow has been associated with the form, you can submit the product to the workflow process, and also perform approval steps.

NOTE: This is part of the Developing a Product Approval Workflow in Dynamics AX 2012 blog series where we show how to develop a completely new workflow to manage the new product approval process. If you want to see all of the other posts in this series, click here.

How to do it…

To submit and act upon the workflows through the Dynamics AX forms, follow these steps:

  1. The first thing that you will notice now that the workflow has been associated with the form is that there will be a workflow header at the top of the form. This allows you to see the workflow that is associated with the form, and also submit the record to the workflow.
  2. If you click on the icon just to the left of the Submit button, Dynamics AX will show you the submission instructions that you have defined for the workflow.
  3. To submit the product to the approval workflow process, all you need to do is click on the Submit button.
  4. This will open up a comment dialog box. If you want, you can enter any comments into the Comment field, and then click the Submit button.
  5. The Submit button will change now to reflect the options for the current workflow step. In this case we will see the Approved and Rejected options for out manual decision, and also the standard Delegate and Cancel workflow actions.
  6. If you click on the View History action, you will be able to see the current status of the workflow, and also all of the steps that have been performed up until this point on the workflow.
  7. If you click on the Approved action, the workflow processor will open up a comment dialog box. If you want, you can enter any comments into the Comment field, and then click the Approved button.
  8. Now that the approval process is complete, the Actions button will only show the View history option.
  9. If you click on the View History action, you will be able to see that the status of the workflow is completed and also see when it was completed.

Before we start workflows running, we need to make sure that workflow processor is up and running so that it is able to move workflows from stage to stage. If you are running in a development environment, a simple way to do this is to use the tutorial_workflowprocessor which you can find hidden away in AOT. This allows you to start and stop the workflow processor on demand.

NOTE: This is part of the Developing a Product Approval Workflow in Dynamics AX 2012 blog series where we show how to develop a completely new workflow to manage the new product approval process. If you want to see all of the other posts in this series, click here.

How to do it…

To access and start the tutorial version of the Workflow Processor, follow these steps:

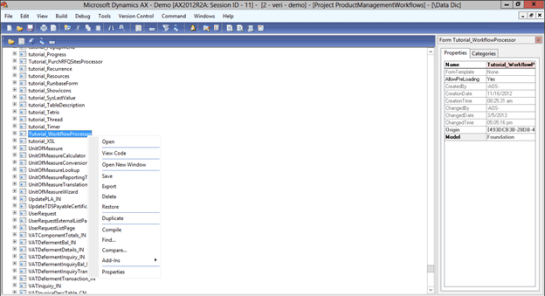
  1. Open up the AOT explorer and expand the Forms node. Find the Tutorial_WorkflowProcessor form, right-mouse-click on it and select the Open menu item.
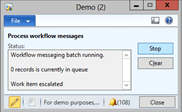
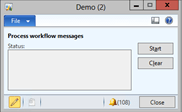
  2. When the workflow processor dialog box is displayed, click the Start button.

How it Works…

Now as long as you have the processor running, it will automatically process any workflow steps that are in the queue.

The final update that we need to do on our workflow type is to add some code top the Approval Handler to tell the workflow what to do when the workflow completes.

NOTE: This is part of the Developing a Product Approval Workflow in Dynamics AX 2012 blog series where we show how to develop a completely new workflow to manage the new product approval process. If you want to see all of the other posts in this series, click here.

Read More

The default labels that are generated by the Workflow Wizard for the submission menu items are a little generic, so it is a good idea to just fix the labels so that they look more appealing to the user.

NOTE: This is part of the Developing a Product Approval Workflow in Dynamics AX 2012 blog series where we show how to develop a completely new workflow to manage the new product approval process. If you want to see all of the other posts in this series, click here.

Read More